Sunny fun in summertime. Great pic from http:fun-a-day.com
Ok, for the last few days we have had sunshine in West Virginia! Maybe we will get some summer in after all!
So here are some GET OUTSIDE and HAVE FUN IN THE SUN activities for kids.
Get out there before it rains again!
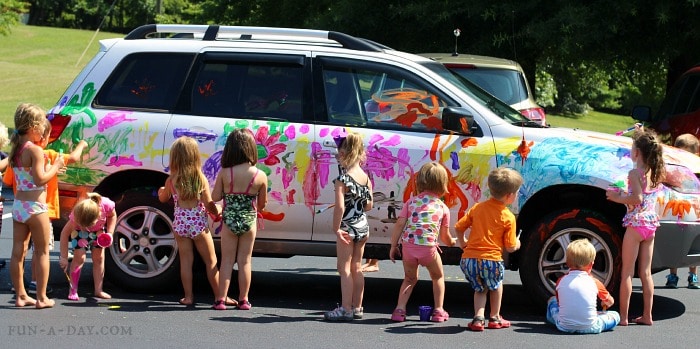
Paint the Car!
On a sunny day, what can be more fun than painting your car? No need for paper or canvas or anything. Grab some homemade paint, pour it into buckets, and let the kids go wild.
When you are done, wash it off.
(and don’t forget to take pictures!)
Play in Water!
Ok, a kiddie pool is the quintessential fun summer water toy. But yes, it can get old. So here are some kick-it-up-a-notch suggestions.
corn-starch or potato-starch peanuts (that dissolve in water – not styrafoam which is a choke hazard)
Try these ideas to keep kiddies in the pool, getting nice and tired, all day long…
Big Art on the Grass!
Summertime means paint outside. Throw down an old sheet, an old tablecloth (all cheap to find at summer garage sales), or old towels! Make some homemade paint, and then let the kids go.
In the pic, the mom gave the kids some old cardboard for painting, but her sons went wild and painted all over the place.
Great idea from www.pleasantestthing.com
And LOOK at the result! Save the fabric to cover your table in the winter!
Paint with your FEET!
In the big art outside vein, don’t forget the fun of being barefoot! Get paint on your kids’ toes, and make the greatest pictures.
more fun from http://4.bp.blogspot.com/
Make some homemade paint.
Grab an old sheet or towels or use paper bags from the grocery, or old cardboard boxes.
Put the paint in some old tubs for the kids to step in. Or use brushes and let kids paint their own toes!
And Voila!
Make Plaster Casts!
great cast from https://s-media-cahe-ak0.pinimg.com/
While your kids have painted toes, try mixing some plaster of paris (cheap at Walmart or a hardware store). Follow the directions on the plaster that you buy! And remember NEVER pour old plaster down your drain!
Mix the plaster according to directions.
Pour onto a paper plate.
Wait about two minutes, and then have your child press their foot into the plaster, but careful not to go to the bottom of the plate. Help your child stay in the squishy part!
Wait about a minute, or less if you have a wiggly kid on your hands.
Gently help your child pull their foot straight up, leaving their print. It is easy to smear, and this can still create a great piece of art, so no worries.
Let the plaster dry 24 hours and then peel away the plate.
Let your child paint the cast of their foot!
Hang a picture hook on the back to hang it on the wall.
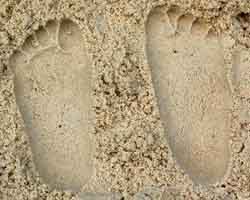
And if you have a sand box, or sand tub, get super easy casts:
Just pour plaster into your child’s prints in the sand:
pic before casting from www.crafts-for-all-seasons.com
Finally!
Never forget the wonderful fun to be had with water balloons!
Fireworks with paints! Just in case it rains again! image from ssydealz.com
It is the rainiest summer in West Virginia! I got my yard weed-whacked today, just before the rain came. Sigh.
So with another rainy weekend looming, here are some fun July Fourth activities for the whole (indoor) holiday!
Make Some Indoor Fireworks
Grab some of your favorite paint recipes, or check the website for some of my fave recipes, and make some indoor fireworks.
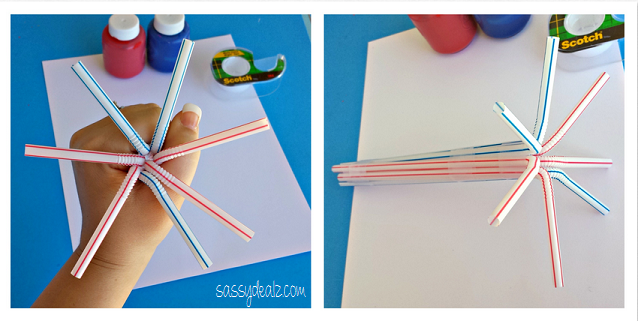
Method One:
Get red and blue paint
White Paper
Seven plastic straws per child
Tape, rubber bands or string
Put the paper on the table. Place paper plates or margarine tub lids out to hold paint. Put the seven straws in a bundle, and fold back the tops to create an L shape with each straw. Bundle the straws to look like a fireworks, and then tape them together.
images from sassydealz.com
Let children dip the straws into the paint and then stamp their straws onto the paper.
Fun idea: Add Glitter!
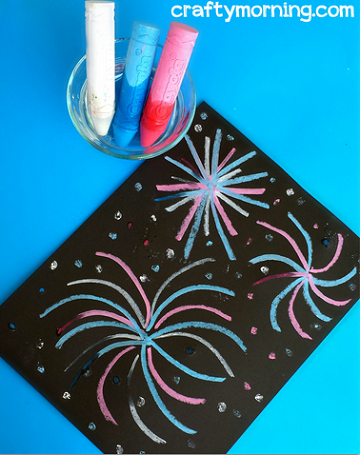
Method Two:
Get Red, white, and blue chalks
Get BLACK paper
water in cups for the chalk
Dip the chalk into water, and then scribble onto the black paper. Simple idea, but check out the dramatic results:
image from crafty morning.com
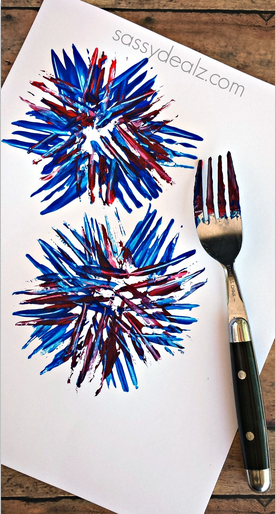
Method 3:
Red, White and Blue paint
any color paper (white is in the pic, but try other colors, too!)
kitchen forks
bowls, margarine tub lids, or wide cups for the paint.
Dip the fork tines into the paint and rub onto the paper to make your own fireworks:
pic from sassydealz.com
OR-
Make your own fireworks – in a Jar!
Get a mason jar or recycling jar out of your bin
Water – fill jar about 3/4 full
Mix 2 tablespoons of cooking oil with about 8 drops of different food colors. Drip the food colors about the oil, and then let your kiddos mix the colors and oil together.
Gently tilt the oil into the water. The colors drop out of the oil and mix together! Water fireworks!
lovely pic from icanteachmychild.com
Fireworks in a water bottle!
Use red, white, and blue pipe cleaners.
Use glitter or confetti, or star confetti if you have them!
water
Scrunch the pip cleaners into spiral shapes.
Add to bottle with confetti….
Pour water into the bottle and put the lid on (or hot glue the lid on if using inside!)
Fireworks in a bottle!
image fromhttp://www.notwiddletwaddle.com
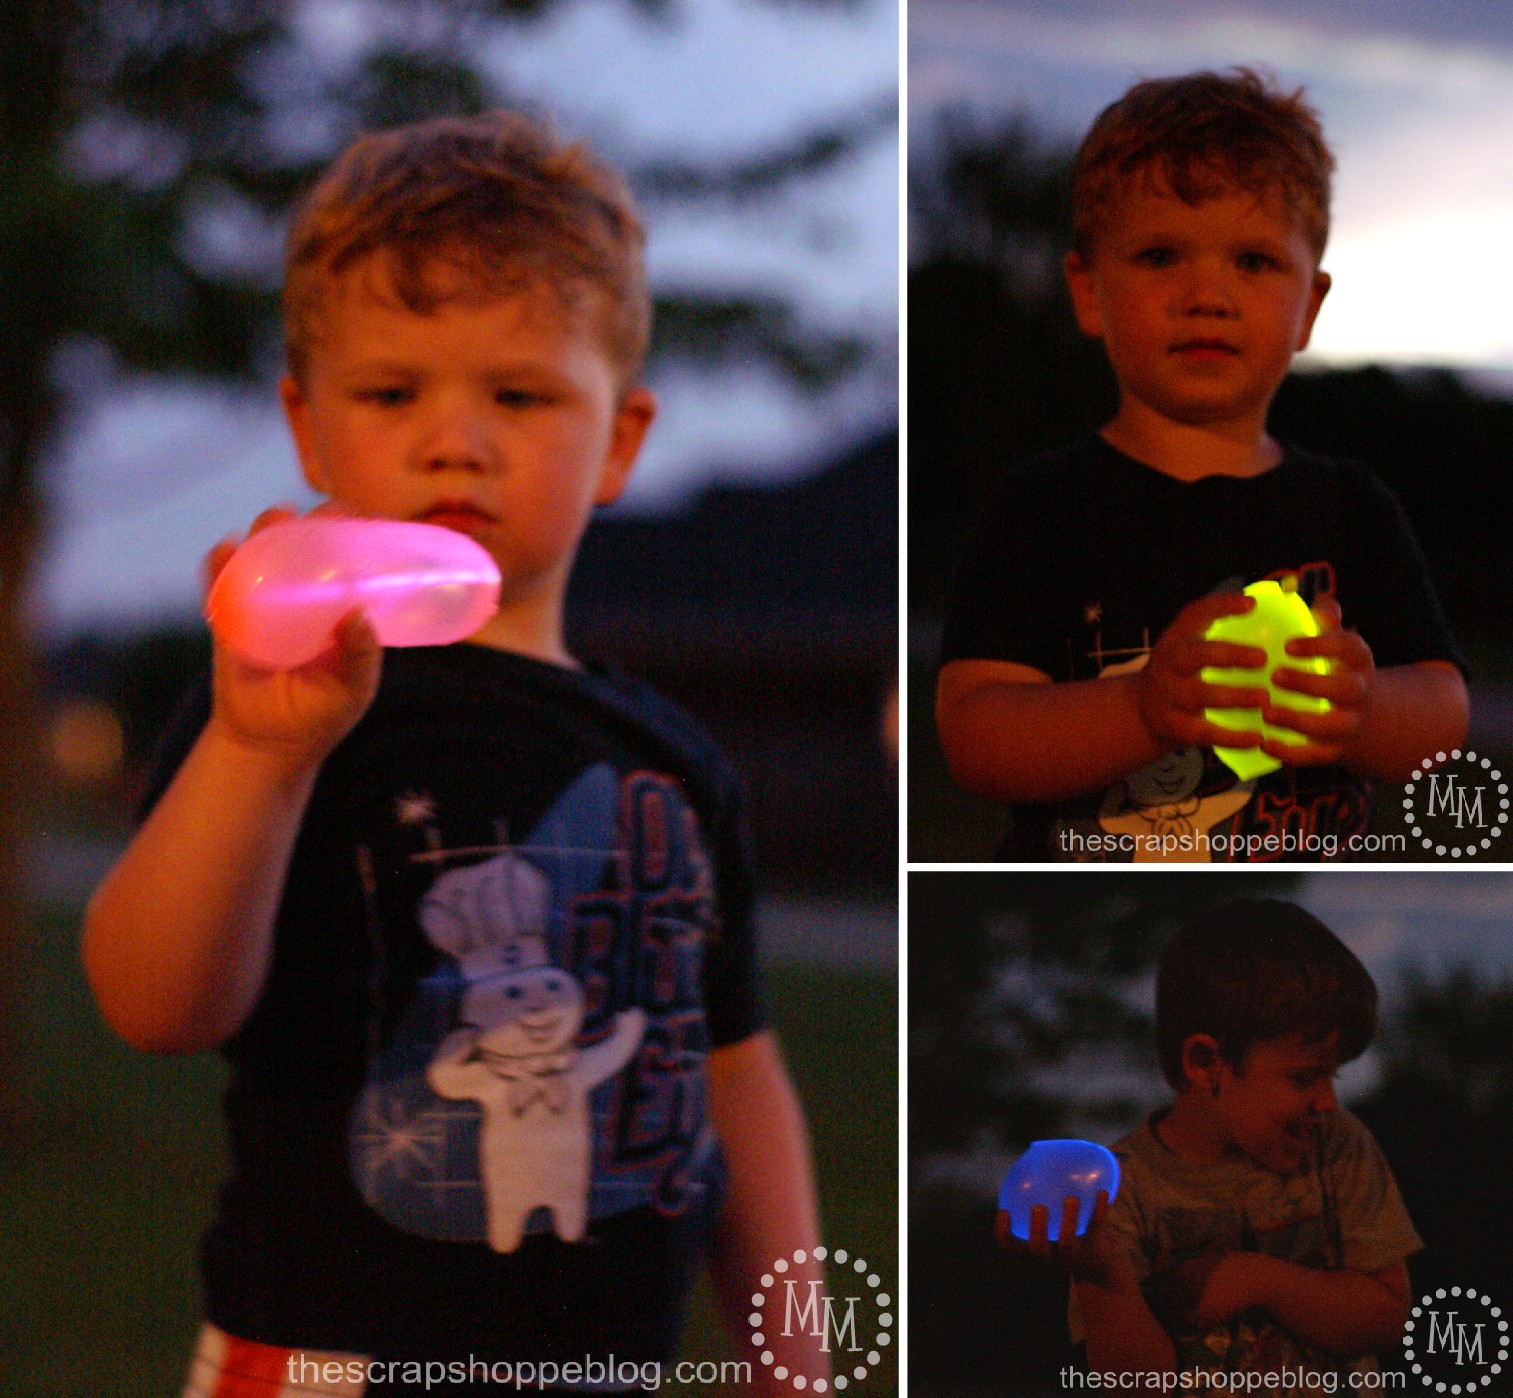
Water Balloon Fireworks
Red, White and Blue Water Balloons
NON-TOXIC glow sticks
water
Let the kids light up the glowsticks. Fold them gently into a roundish shape, and gently pull the water balloons over them. If the glowstick breaks, it is NON-TOXIC, so no worries. After the stick is in the balloon, add water!
Voila!
how cool is this? from thescrapshoppeblog.com
And finally:
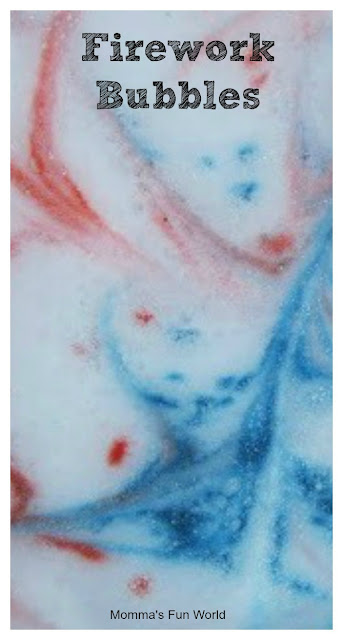
Fireworks Bubble Tubs
Fill a bucket, pan, pot, or even the bathtub with water and dish soap. Add Red and Blue food coloring (or Kool Aid), and stir it up! BUBBLES! Colors! Fireworks in a tub.
pic from mommasfunworld.blogspot.com
I hope these ideas help everyone in the WHOLE Families community have a wonderful, safe, and rainy Fourth of July! I’ll cross my fingers for fireworks and parades…. 🙂
I love using soda cans to make crafts with kids. They are free after you drink your soda; they are easy to cut; they last forever, and they are so CUTE!
Here is a round up of soda can crafts, some for the wee ones, and some for the older crowd! Moms and dads find themselves liking these, too!
First of all: How to cut a soda can for crafting!
This video uses scissors and a craft knife; I have used scissors alone to cut cans, and it works fine. Just poke a hole with a sharp point in the scissors, and cut. I have never been cut too much from cutting cans, but if you let the kiddies do some cutting, you might want to use gloves or cut the can up first, and then let kids do the rest!
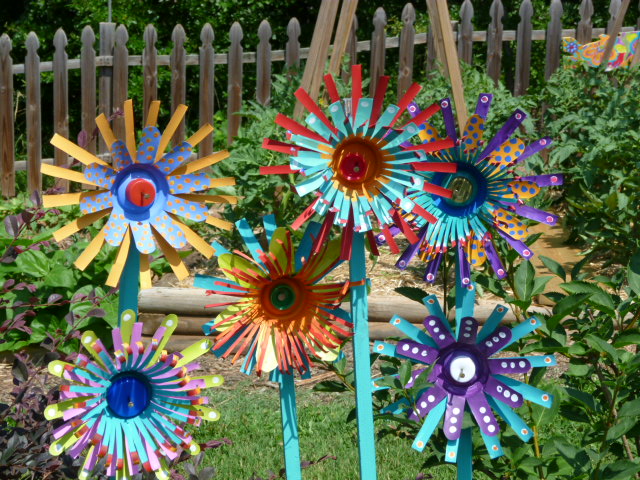
Soda Can flowers
super easy soda can flowers from karenlucci.blogspot.com
This is the easiest soda can flower, super simple for wee ones! For the littlest folk, mom and dad do the can cutting, and let the toddlers and 2-year-olds do the paint!
Materials
Soda Cans
Scissors
Paints – for outdoor use, try acrylic, or spray clear acrylic on after the kids’ painting dries.
Cut off the top of the can, but not the bottom.
Cut down the can to the bottom, making “petals.” Try different widths and shapes of petals like the picture.
Flatten out the petals.
Paint!
You can attach the flowers to dowels for the garden, or use to decorate around the house.
More Flowers
lovely magnet flowers from tenthmusestudios.wordpress.com
Materials
Soda Cans, with both ends cut off and the middle flattened
Paint if you want!
Brads for scrapbooking
Cut out three flowers of slightly different sizes:
detail from tenthmusestudios.wordpress.com
Paint if you wanna!
Layer the flowers and insert a scrapbook brad into the center of all three flower shapes.
voila!
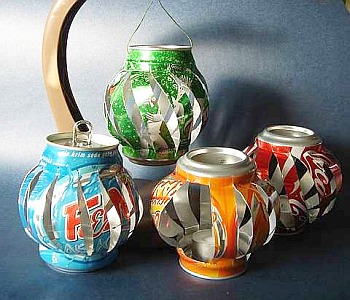
Soda Can Lanterns (for older kids)
awesome lanterns from dollarstorecrafts.com
Take an empty soda can and fill with water.
Freeze for about six hours.
Make twelve dots with a marker around the top and bottom of your can.
Draw a line from a dot at the top of the can to the dot just behind the same one as you just drew but at the bottom .
drawing of the soda can lantern details from:http://www.thestar.com.my/story/?file=%2f2009%2f3%2f16%2flifeliving%2f3457045&sec=lifeliving
After drawing the lines, use the craft knife to cut the lines.
Let the ice melt!
Slightly twist and flatten the can to create the lantern shape.
Punch two holes in the top for a wire to hang, or use the tab if still intact!
Voila!
Pop Tab Bracelets (or belts if you are inspired), for older kids
Flattened soda can portraits – super fun for all ages!
Who says you have to have perfect soda cans for art?
from theartofed.com blog
Take flattened soda cans.
Paint them.
In the pic above, older students then glued their soda cans onto collages they made with junk paper. And you can do that, too!
Or…
another kid version from http://cahierjosephine.canalblog.com/
Just glue the pic onto a piece of cardboard (and let the kids marker and paint it first, too)
How cute are these?
Be as wild as you want:
from the smartartteacher.com
Finally,
Soda Can Dog Tags
For little ones, cut out the dog tag shapes from your soda can; for the bigger kids, let them cut their own.
Use a hole punch or your scissors (I have done both) to make a hole to hang the dog tag.
These in the picture are left unpainted.
Or paint!
Use sharpies!
Glue on them!
Soda Can dog tags, like the flowers above, are a great blank slate for kids to make art!
http://www.craftster.org/forum/index.php?topic=98967.00; the original crafter used an expensive cutting machine; I find scissors work fine!
Feeling inspired! I was at a picnic this weekend and came home with dozens of cans, and am working on flowers! Please share any fun ideas you find.
Get out there, get your kids, and get making summer art!
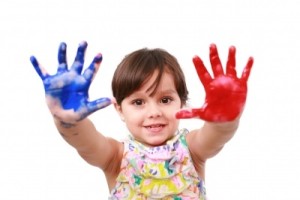
Your child dislikes touching fingerprint or playing with paint? Try some of these ideas with the homemade paint recipes I posted two weeks ago…
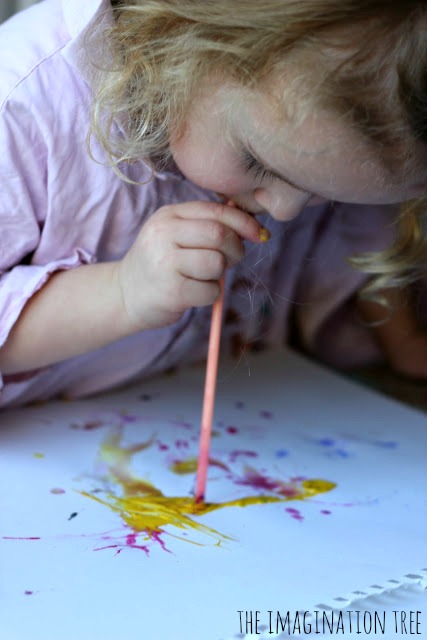
straw paint photo courtesy theimaginationtree.com
Paint with straws!
Get paper.
Get straws.
Mix some food coloring homemade paint.
See pic above for the idea! Use food coloring and water paints, and let the kids drink this to their heart’s content.
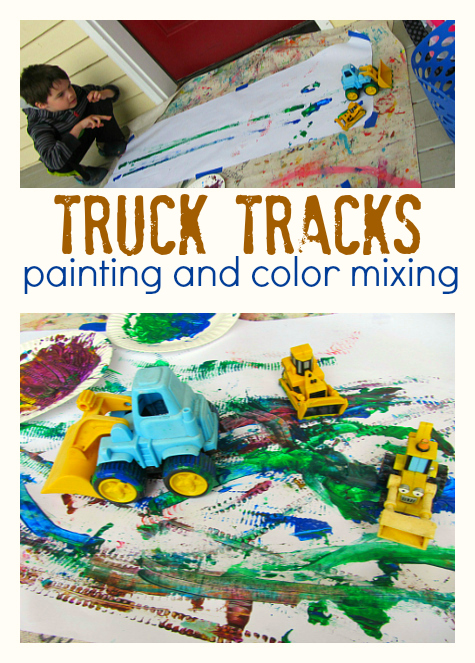
Toy car or truck painting!
Get paper.
Find some matchbox cars or play trucks.
Mix some paint.
Let the kids explore!
truck painting photo courtesy of notimeforflashcards.com
Marble Painting
Get marbles.
Get paper.
Get a box to put the paper in.
Mix some homemade paint.
Put the paper into the box, and pour some blobs of paint onto the paper. Put marbles into the box and then let kids tilt and wiggle the box to create marble tracks through the paint.
marble paint photo courtesy of 4.bp.blogspot.com
Feet painting!
Get some paper.
Make some homemade paint.
Get some kids with feet.
Tape the paper to the floor – outside is easy, inside put lots of extra paper down around your art paper – and squirt paint onto the paper. Get kids with bare feet and let them walk, squish, wiggle and slide through the paint.
If inside, have some towels and water pails ready when the fun is done!
feet painting photo from homegrownfriends.com
Fruit painting!
Get some apples, oranges, pineapple, or strawberries.
Get some paper.
Get some bowls or margarine tubs.
Make some homemade paint.
Let kids dip the fruit into the paint and make prints – or smears – or globs.
All is good.
photo courtesy http://cdn.homesthetics.net/
So start thinking of fun things to do with paint! Try feathers, sticks, rocks, q-tips, balloons, potato mashers, forks and spoons, corks, potatoes, pasta…. whatever you can dream of and have around the house!
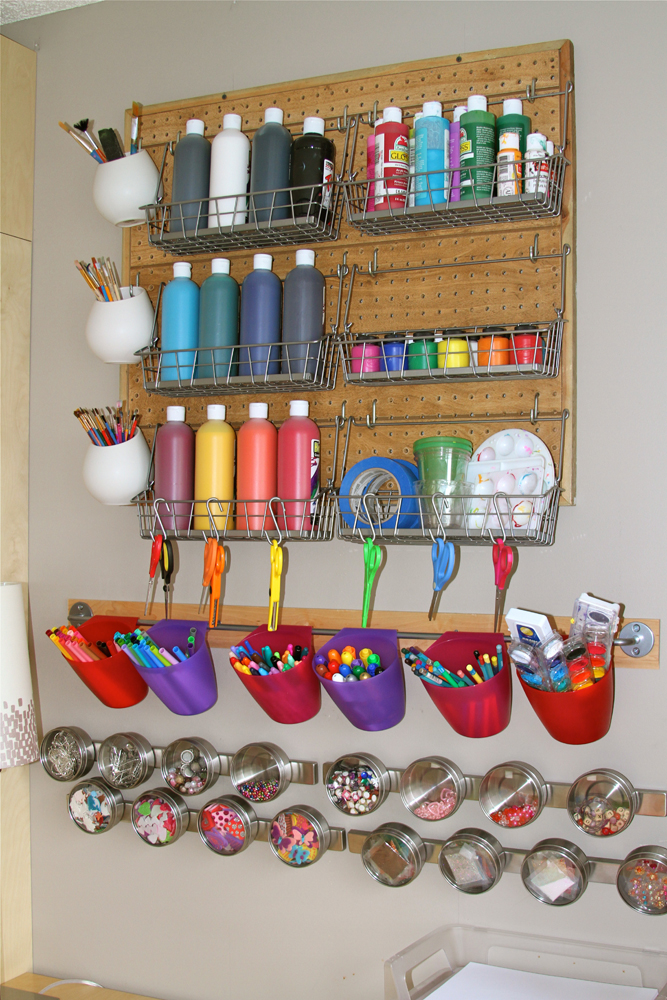
Ok, lots of families have been asking me about art supplies, and what to buy, and what to keep on hand. So great idea for a web post!
Here are the supplies I suggest you keep around, from the bare minimum, to some store-bought special items. But remember, with the bare basics, you can do lots of art!
So here is the Bare Minimum Art Cabinet for a family:
Food colors ( a necessity for so many projects! )
Paper (get paper when you buy groceries and cut it into drawing and craft paper at home… also ask around for paper! Stores often have out of date flyers and will gladly share them for your child’s art!)
Salt (cheapest non-iodized salt you can find!)
Flour (I buy the cheapest white flour for art and save the better flour for cooking…)
Baking soda (I but the largest amount I can afford – this stuff is in so many projects!)
Vinegar (see above! get the most you can as you use this so much!)
Corn starch (another essential, so buy a big box!)
Home recyclables – any and all! Peanut butter jars and cardboard cereal boxes and toilet paper rolls and paper towel rolls and parmesan cheese jars and margarine tubs and soda bottles and plastic lids of any shape and size! Save junk mail for paper or for crafting! Use #6 plastic from your veggies and fruit to use as a cheap shrink dink! Keep this stuff and glue it, paint it, smear it, and use it to store your art supplies as well!
And there you have it! With the above essentials, you can make all types of paint, watercolors, play dough, goop, paste, glue, slime, sensory activities, fun paintings… So I really recommend trying to keep these supplies on hand!
fun art pic from an organized parent – not like me at all! from hollysartcorner.blogspot.com
Now for the extras, things to pick up when you see them on sale, or when you notice someone throwing them away (cheap!), or I have pulled things out of other people’s trash. I especially “rescue” other people’s large boxes, those big plastic laundry jars people toss out, and any paper I see. So don’t think “extras” means paying out big $$$. Not at all.
Paint brushes. These are hard to find, not always easy to make (though be creative, as flowers, q-tips, sponges and just plain old fingers also work), and for some special art projects paint brushes are nice to have.
Tape. I prefer duct tape, which can be expensive, but then again ask all the shop guys in your life for the end of their rolls. Also scotch tape and painter’s tape can be handy.
Q-tips. Some families always have these, but not all, so I don’t list them as a basic. But q-tips make great paint brushes as well as fun ways to smear any type of slime or goop. If you have a kid who is a bit timid about touching goop, q-tips work (but so do spoons!)
Adult glue. You can make all the paste you want with flour and water, or glue as well, but for some fun art projects having a good adult glue about is great. I am thinking Aleene’s craft glue (nope, I’m not an affiliate) or any other kid safe glue that is strong and holds well. No! Don’t think crazy glue! I have heard horror stories about some of the super glues out there, so stick to stuff that is safe, though still more for adults.
Kid glue. I don’t use kid glue to glue – that is what homemade is for. But if you have one of those kids who loves slime and goop recipes, then watch for a Michael’s 50% off coupon and buy kid glue by the gallon. It comes in handy to make glitter glue paint, and is essential for some slime recipes.
Straws. Kids’ plastic drinking straws aren’t a necessity, but they can be so much fun. They look great on glue sculptures, and make great beads to string for necklaces. They also work great to blow glue, or paint, and you can make some fun balloon rockets. If you see sale straws, grab ’em.
Clear Contact paper. This is another great fun material. Buy it on sale at Walmart or Michael’s. You can use it to make fun placemats, sun catchers in the window, neat paintings, and it is wonderful for kids who struggle with glue mosaics.
Shaving cream. The all time most fun substance for some kids – gooey, wet, takes food colors well, can be used to clean the table or in the tub. I buy the cheapest I can find, and save it for those long rainy days when kids need something really fun.
Tissue paper in many colors. Again, don’t buy paper for drawing – too many stores will gladly share with you. But tissue paper makes a great material for watercoloring and for glueing. It goes on sale at Walmart regularly, so just watch for sales.
Construction paper. This is a pretty standard thing for parents to buy, but it isn’t necessary for many projects. But if you do want to add to your art supplies, it can come in handy. Buy on sale or save your coupons.
Stamp pads. Most any paint will work for stamp art, but sometimes permanent stamp pads are useful for making a special mother or father’s day gift, or for permanent art. These require supervision, kinda like sharpie markers, so use and buy sparingly.
Crayons. A lot of kids on the autism spectrum do not have the hand strength to use crayons well. So I don’t really suggest buying these except for special projects. On the other hand, old crayons are easy to buy at Goodwill or garage sales, and they are fun for things like melting into rainbow crayons or ironing in wax paper….
Markers. Cheap kids’ markers at Walmart or Michael’s are useful for the days when you don’t want to mix up another jarful of food coloring and water. But these can be expensive. My solution is to buy five boxes when on sale at the back-to-school sales in late summer, when you can get these boxes of markers for $1. Hide the boxes and try to remember where you hide them!
I’ve included a great pic from an organized mom’s blog – definitely not like me! My art supplies are always falling out of cupboards! But think of fun and easy places to store art supplies, and remember to fill up with the junk from the recycling bin!
Art is too important for our children’s development to NOT try fun art projects almost every day. You don’t need lots of cash, just lots of imagination. Share with the kids on those grumpy days when everyone has the blues. I recommend doing some kind of art every single day – it will make a huge difference in your day, in your kids’ skills, and it doesn’t have to cost much at all.
So many fun pinterest kid activities require paint. And paint at Walmart or Michael’s can cost up to $4 a bottle! YIKES!
So here are cheap and easy, make at home paint recipes to use all year long! Base ingredient is food coloring, so when I see food coloring on sale or have a good coupon I stock up! When you have food coloring, you always have paint. (For the adventurous, Discount School Supply and Oriental Trading have liquid watercolors in large bottles and great colors… I have used both, and prefer Discount School Supply. I have no affiliate links to either company, so just saying they make a great product. Or try Amazon!)
So here are the recipes!
DIY Bath Paint
1/2 cup Johnson’s Head to Toe body wash
1/2 cup corn starch
a few spoonfuls of water (add slowly)
food coloring
Mix the ingredients together and add water slowly until a runny paste that sticks to the tub but is not too runny… Then put into ice cube trays, old yogurt tubs, margarine tubs – whatever you have handy. Finger paint or buy cheapie paint brushes. Just give to kids in the tub and have fun.
Condensed Milk Paint
One of the easiest, creamiest, and safest to eat of all DIY paint recipes: condensed milk paint.
Simple: mix food coloring into small pots or tubs of sweetened condensed milk. Keep this one covered in the refrigerator, and it will last several weeks.
Doodle Paint
Another simple paint, but be sure to wash brushes thoroughly!!!
Mix food coloring into white glue (such as Elmer’s or Rose’s). Use in squeeze bottles (save your ketchup and mustard tubs!!!) or use with brushes, but the glue will dry so do wash everything well! Store the glue paint in tubs and use again and again.
Homemade powdered tempera paint
Powdered tempera paint is used in SO many fun paint recipes. But it is not cheap, and not easy to find at that. But you can MAKE YOUR OWN! fun fun
Get cheapie colored chalk at the dollar store or Walmart, and buy some good ziplock bags as well (you will need them). Put one color of chalk in each bag, and then get a mallet or hammer and smash the crap out of the chalk. This is a fun activity all by itself! After crushing, store in plastic tubs. When you use powdered tempera to make other recipes, be sure to wear a mask, as airborne powders are not good for your lungs!
To make a simple paint, simply add water (wear masks until mixed!) and maybe a little kool aid for scent! Once mixed, paint away.
Kool Aid Paint
Mix water, Kool Aid, and corn starch into whatever paint consistency you need. Lots of water makes a thick watercolor paint. More corn starch makes a thicker, tempera style paint. Make extra thick paint and you will get a paint to put into squeeze bottles (remember save those ketchup bottles!). Store these in the fridge, and if they separate, just stir again before using!
It looks to be a rainy week here in West Virginia, and is raining as I write today! This is the best kind of weather for fun indoor play, and paints of all types are easy and cheap ways to get kids messy and exploring. Let them paint and get a cup of coffee.
For a fun rainy week activity, try putting pictures made from your homemade paints out in the rain, and create neat impressionist-style watercolor prints! Don’t forget to don rain gear and go for a rainy spring walk. Kids and puddles don’t last forever.
Ok, last week was fun and free for spring…. this week I add to the ideas for fun stuff with easy exploding paint, recycling crafts, and fun outdoor adventures! Enjoy!
erupting ice chalk! easy and cheap! from learnplayimagine.com
Ok, erupting sidewalk paint you make at home?? How cool!
Take 1/4 cup cornstarch
1/4 cup baking soda
some food coloring – use different colors! have fun!
1/2 cup water
Mix ingredients together and spoon into ice cube trays to freeze! Once done, get outside and use the melting mess to make wonderful art! If you don’t have sidewalk, you can use cardboard boxes from the supermarket instead. Let kids blend, play and explore melting colors.
After the coloring is done, give kids squirt bottles of vinegar and let them squirt their creations! Instant exploding color, plus oozing paintings. How much fun is that? If you wanna save the resulting art work, use plain paper to print over the oozing mess, and voila! Exploding refrigerator art!
Jellyfish in a bottle!
All the steps are here! Enjoy! from Sussle.org
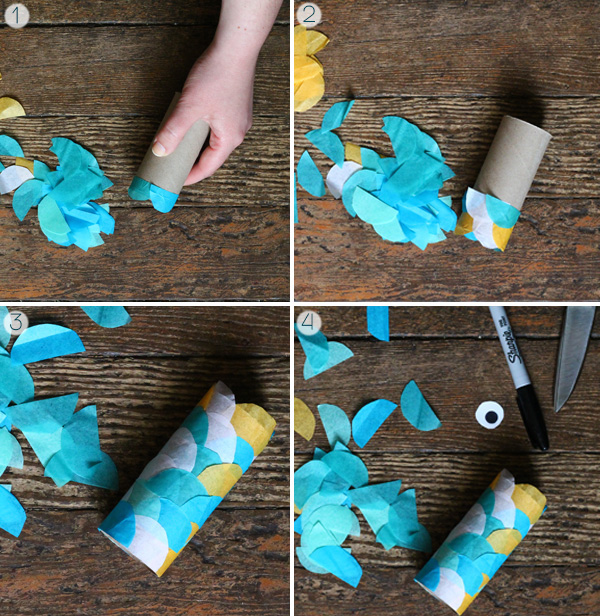
Toilet paper tube fish kite!
Supplies are simple:
toilet paper roll
cut up colorful plastic bags (I love the bags from Sheets)
markers or construction paper or crayons
don’t try to be this clean – let toddlers be messy. Add an eye or use a marker after the fun! from squirrlyminds.com
Decorate the toilet roll with cut up plastic bag fish scales – or use markers, paint, food coloring, or any fun supplies you have. Add a white paper with black marker eye – or draw one! Or color one! Or use paint or anything else you have! The fun is the goal!
Cut strips and strings from the leftover plastic bags, and glue, staple or tape the strings to the end of the roll, creating lovely fins! You can hang these from strings, wire, yarn, or anything handy! Let kids run about in the wind and watch their carp fly! And when they break (which they will), make some more!
Get OUTSIDE activity! for rainy days!
A super fun activity for outdoors in getting outside in spring showers! Don’t think you need lots of supplies to enjoy time with your kids.
So on a rainy day when kids are bouncing off the walls, go outside and take a walk. A definite plus for this activity is old, broken umbrellas for carrying, but I’ve walked with kids in rain gear and boots. Or just throw on some coats and plan on doing laundry when you get home.
Rain makes for wonderful play. Explore puddles, (do jump!), watch rain in street gutters or your house gutters if you’re in the country. Stand under trees and see what happens to the rain – pine and spruce and hemlock give more protection than a redbud, for example! While out there in the mud, find sticks, throw them in a stream, build stick and grass boats, watch water run downhill, and enjoy being outside! Kids are learning so much when they are outside with you!
And don’t think this is for toddlers alone. I have walked my church youth group around in the rain, and they loved it! Teens like time with grown ups, even though they don’t admit it!
So there you have it: a week of fun activities! Get out and enjoy parenting!
Almost every home we visit has matchbox cars or something similar. And everyone seems to use toilet paper. So here is a craft for you: use your TP roles, some scrap cardboard and duct tape to build a maze that will grow and expand – and be cheap to throw away when your kids destroy it – which they should! Kids need to explore, and cheap, recycled crafts are the thing to use for fun and educational destruction.
pic from “a happy wanderer” bloodspot
Supplies:
Toilet paper rolls
Scrap Cardboard
Duct Tape
Scissors
Somewhere to lean the finished project!
So take your toilet paper tubes, and cut them in half. (older kids can help with this, or cut ahead of time) Find a large piece of scrap cardboard (every appliance store I have ever visited will give me cardboard boxes) or ask Walmart for some large scrap boxes and they will happily share. Or save your own.
Use the duct tape to arrange and secure the TP half-rolls to the scrap cardboard. Have your kids help! This should be fun. Arrange the half-tubes in any pattern you want, and encourage exploration. Kids want to create mazes that won’t work, in that the cars won’t roll down the tubes properly. That is the point! By arranging and re-arranging the rolls, kids learn important things, such as “match box cars won’t fly across a cardboard box for two feet without more support.” This is physics and math. And the more they explore the less trouble they are in.
So I am showing you a picture of what the “finished” maze can look like, but please please don’t make this for your kids. And don’t worry about buying balls, matchbox cars are fine! This is a fun activity for you and kiddie to do together…. and btw, my teenager youth group loved this activity, too, and worked at it for hours. So teen Vacation Bible school teachers, pay attention!
Recycled Board Game!
There are tons of used kiddo board games out there – check Goodwill, flea markets and garage sales. All are missing pieces, have chewed up corners, and falling apart boxes. But they make a fun activity.
here a mom did the fun work, but you can use dominos or scrabble tiles (if child is over three – scrabble tiles are not choke-proof) for your child to make into a game that is about them! From artsyants.com
Supplies:
Chewed up old board game or dominoes or scrabble tiles if your child is over three years old (scrabble tiles are not choke-proof!)
Pictures of any sort or kind
Scissors – or tear pictures with little kids
Paste (mix flour and water to thick consistency)
Markers if you wanna color
Paint if you wanna paint!
Find one of your own chewed-up board games, or get one cheap at flea markets… and then let kids have fun with them.
You can cut up junk mail, kids’ art work, old photos, and use a homemade paste or store-bought glue to affix the paper to the game: re-make that chewed-up board, cover up the old cards from a monopoly set, color over matching picture tiles. The idea is to make something and have fun!
Older kids can create their own, new, self-designed game. Younger kids create lovely messes. All is good and fun. Just remember: the idea is to have a good time!
Here a family glued pics over a Clue game to make their own new board game… but with little kids, remember to make way more mess than this!! Original post at: http://www.craftstylish.com/item/11226/how-to-remake-a-custom-board-game
Make Mud!
Ok, this is not just for little ones! Mud is so much fun, and families buy expensive play doughs forgetting how much fun the original clay really is. Do this inside (in the tub works) or better yet, outside!
mud and grass: hours of fun picture: personal collection, copyright Claudia Neely
Ingredients are simple:
Dirt
Water
(if inside, some container or bucket to hold the mud)
optional: old pots and pans, muffin tins, margarine tubs, yogurt cups, spoons, spatulas, boxes from the trash or recycling, pots, seeds… whatever is cheap and easy!
Mix ingredients, stir.
And enjoy!
Mud should keep your little ones super busy for hours. If you have a kiddo who is sensitive to textures, mud can be challenging, so adjust YOUR expectations accordingly. Allow your sensitive kid to stir mud with spoons, sticks, an old ruler. The more you participate in mud and have fun, the better your child will see that mud matters.
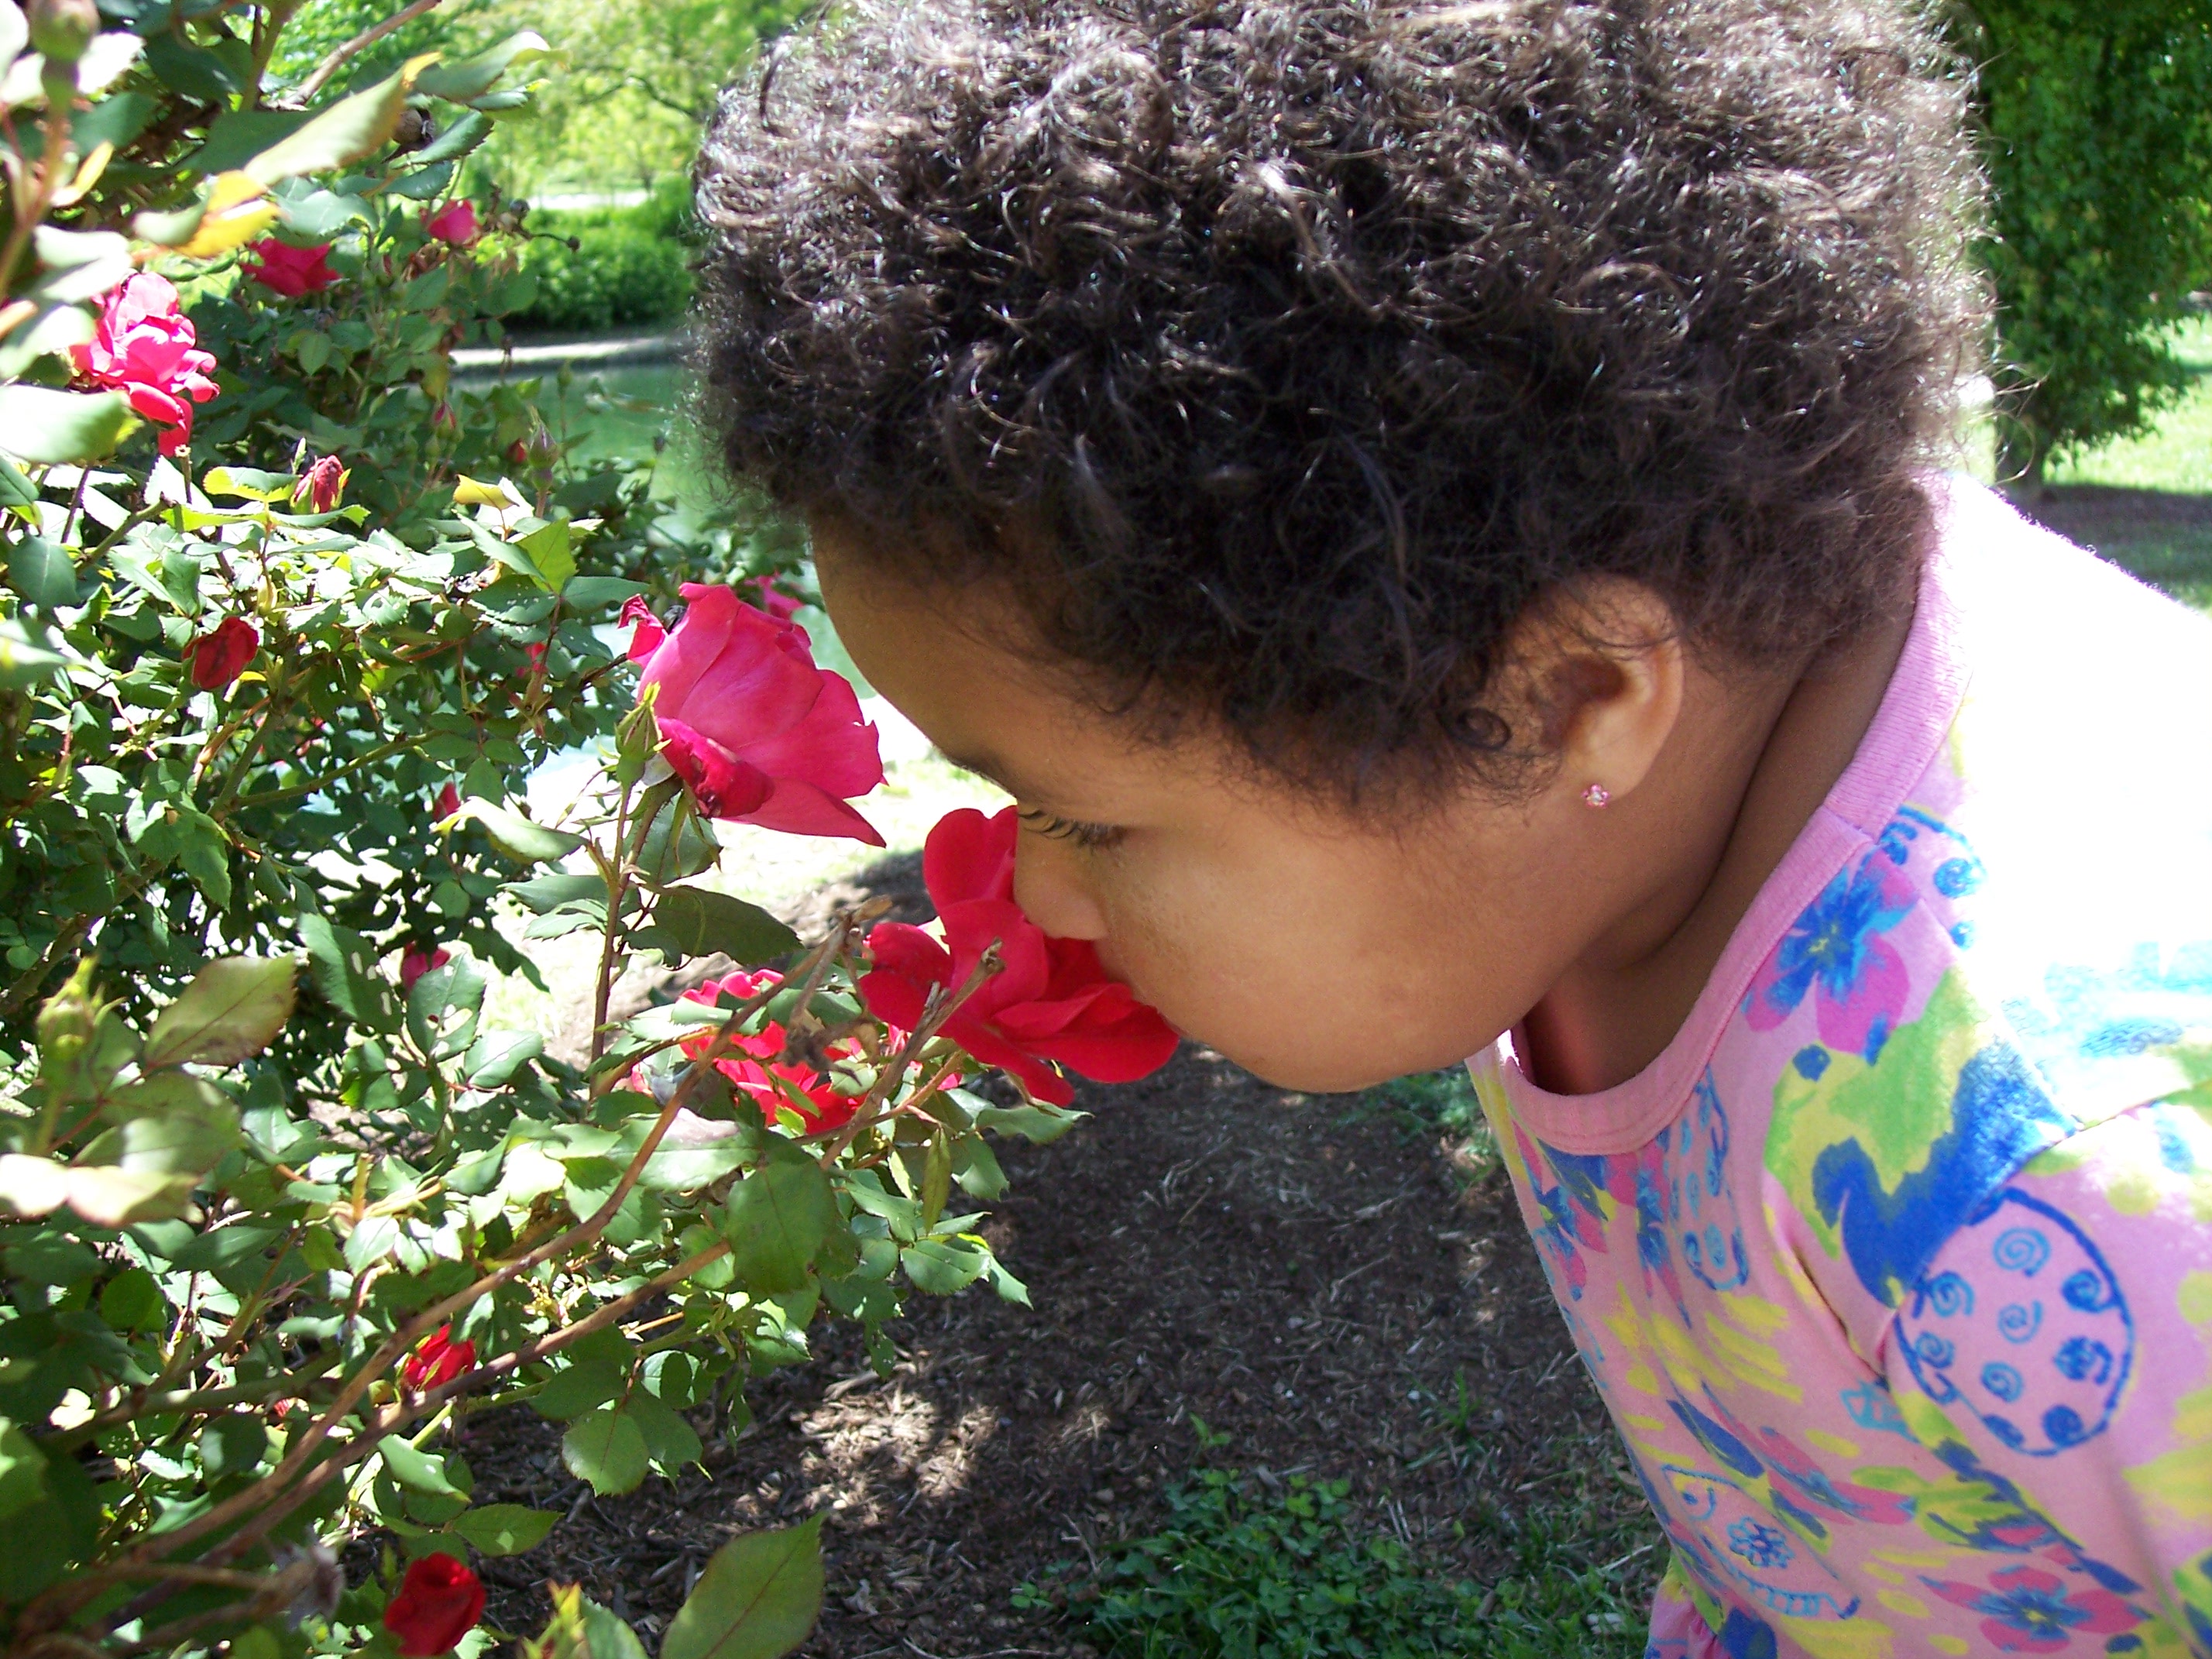
Flower Walk
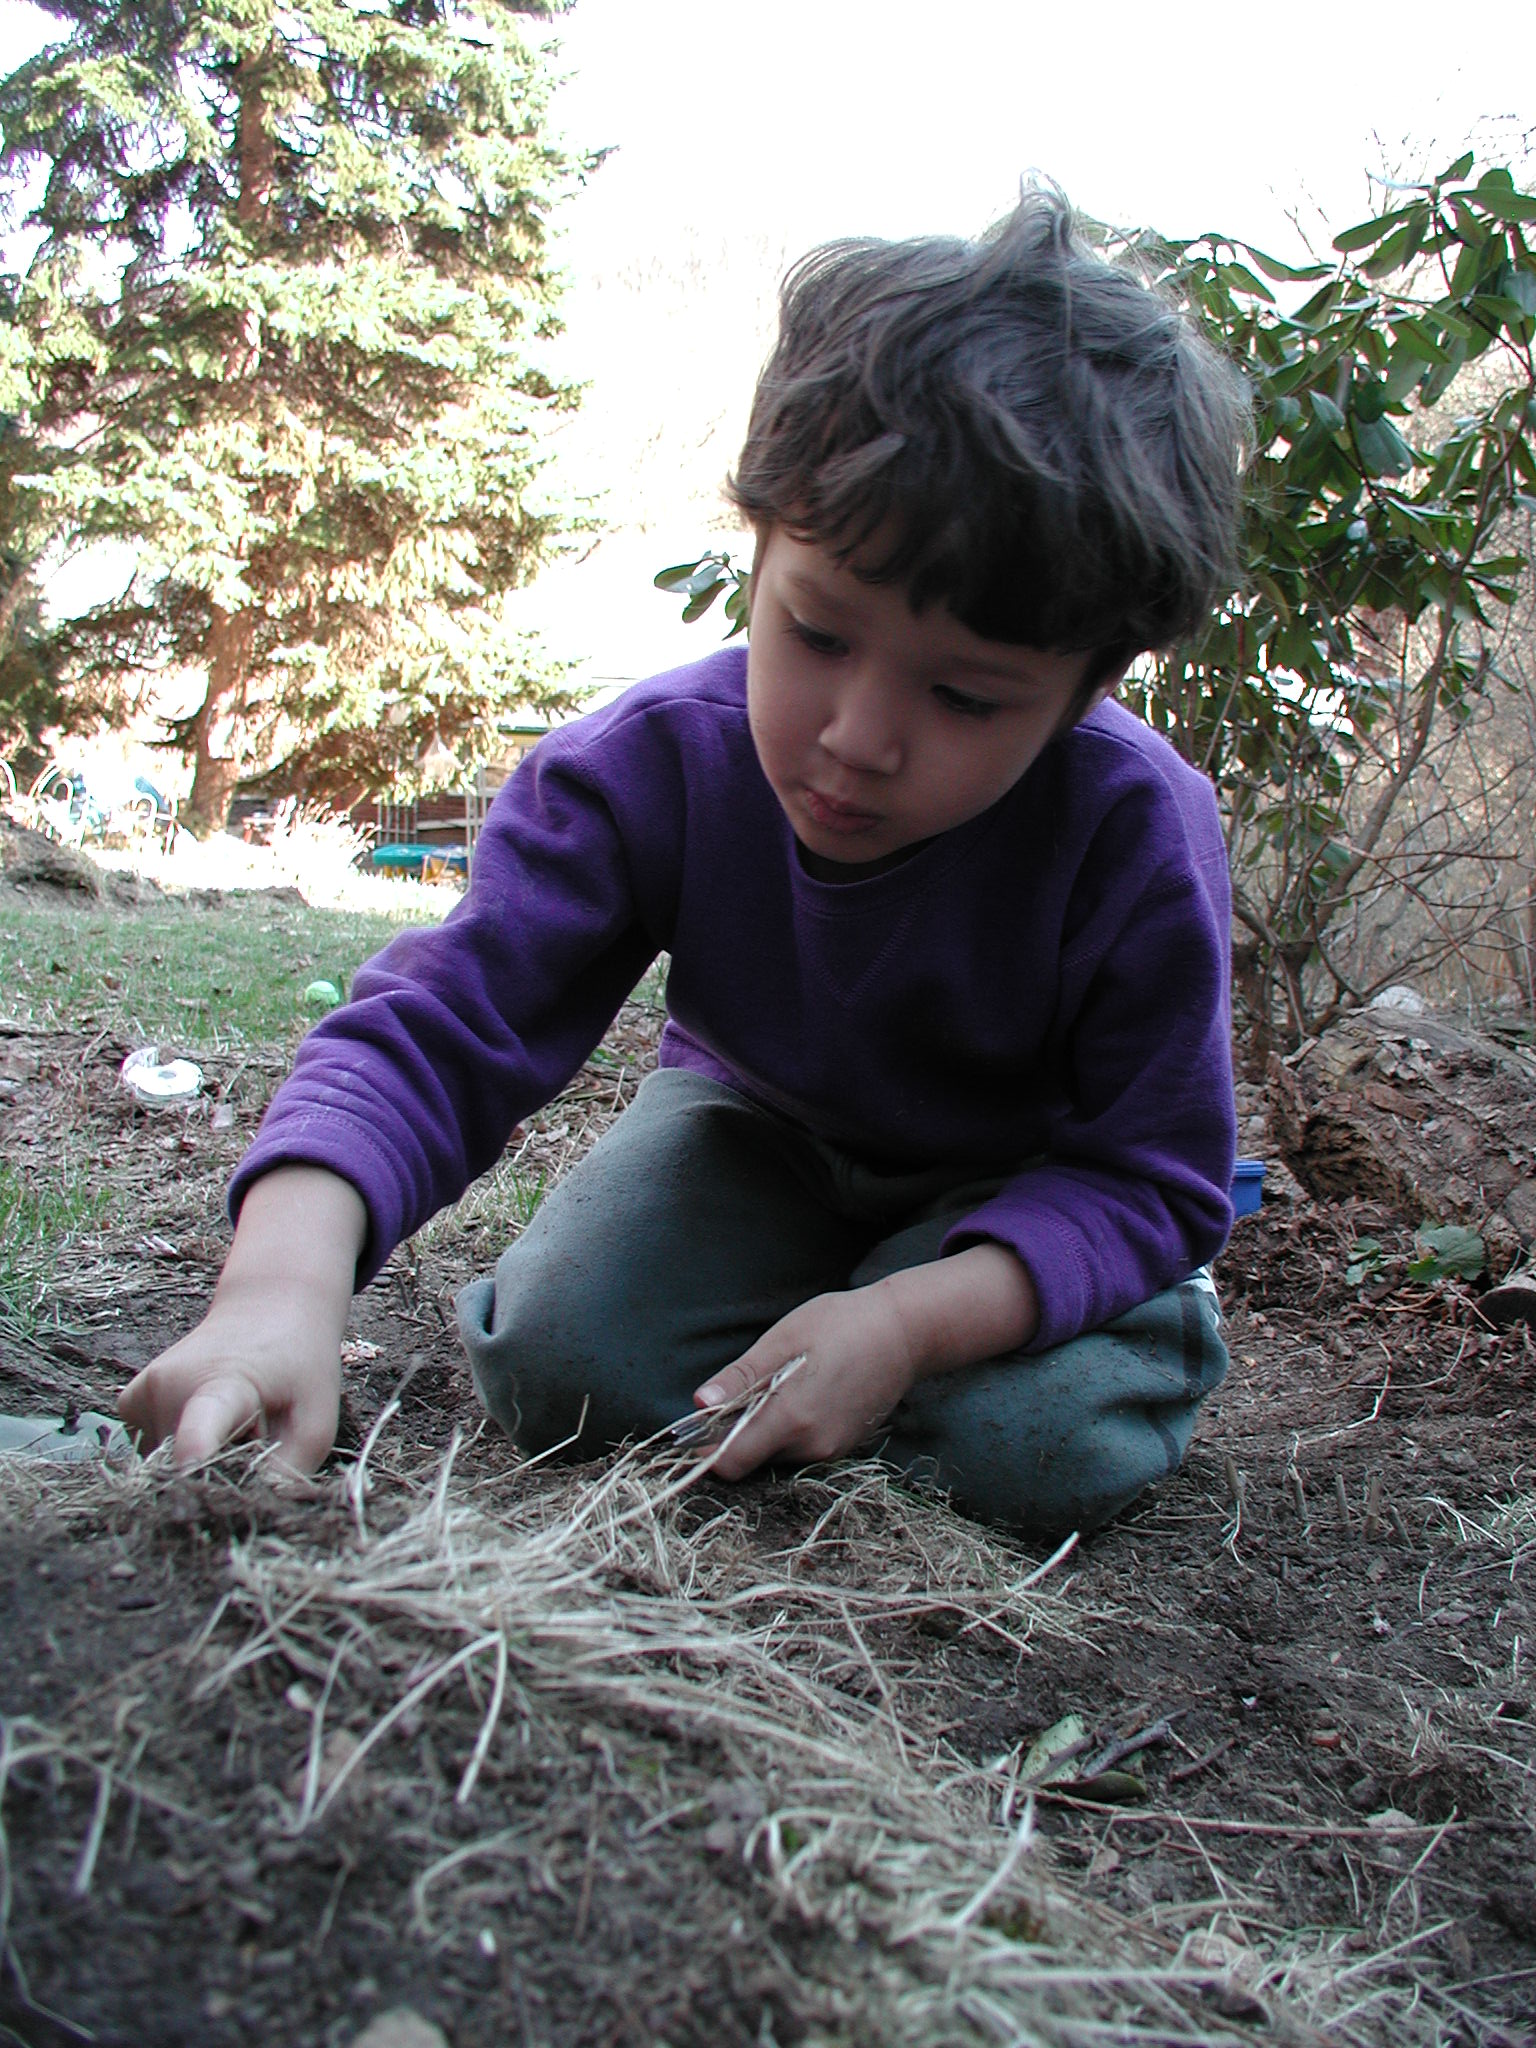
Ok, it is MAY!!!!! After this snowy winter, it is great to get outside! So GET OUTSIDE!
Walking with children is a wondrous activity. Yes they look at every rock on the path. Yes they find every stick amazing. Yes each dandelion is cool. But isn’t that the wonder of kids??? They remind us that yes, every rock is amazing. So go outside with the kids and enjoy them and the world. They will show YOU amazing things.
Supplies:
You and kids.
Outside.
Maybe a bag to collect stuff.
smelling the roses… pick with permission. Pic from private collection, copyright Claudia Neely
Take the kids and go walk somewhere with lots of wild flowers. Try a park, your neighbor who hasn’t mowed (guilty of this myself), or just your neighborhood. Go walking and look at flowers, and suggest collecting the wild ones in bags: find dandelions this week aplenty, violets, buttercups, and anything else that is weedy and pretty. Bring the flowers home to enjoy – as a bouquet, as a mishmash mess (some kids scrunch their flowers and this is ok), as fun supplies for your mud activity (see above).
Warnings: don’t pick flowers on state or national lands, and don’t pick your next door neighbor’s prized peonies. If in doubt, don’t pick. There are always plenty of nice weeds, so if your little one is heading to pick grandma’s favorite rose, just re-direct your kiddo by saying, let’s pick this one over here! Usually works.
The fun of flowers is that weeds are plentiful, fun, and many even edible (dandelion leaves are, buttercup leaves are, and violets are)! Best of all, enjoy the fresh air, the fun of walking, and the knowledge that your child will be worn out and sleeping soon.
So there you have it! HOURS OF FUN activities, for you and child/ren, no matter the age! The point of all of these ideas is to spend time together, to get your child/ren active, to have fun. This is not “make a masterpiece” time. It is FAMILY FUN time.
Driving all over the state of West Virginia, we work with super active and busy families who are coping with autism, trauma, and other related developmental disabilities and diagnoses. And everyone is struggling when kids are bored and tired… true for families with teens or families with 12-month-olds. Everyone looks forward to us visiting because we bring fun new stuff (which is why we call our work PlayBA!) I am often trying to leave craft and activity ideas for families to use between our visits, and encourage Pinterest use! Still, finding and sorting activities when you are tired and kids are crying and dinner isn’t done can be a struggle.
So now this is our new weekly blogpost: a week of activities for you and your child. Ok, many activities are preschool friendly, but with a little adaptation lots of these are fun for older kids, too. If your positive behavior support plan requires your teen to do some kind of activity other than computers/videogames, then here is a resource for you, too!
So check our blog weekly and
I will set you up with a week of fun activities. I will encourage you to use your trash and recycling for most activities (cheap cheap cheap!), and make the cheapest, Walmart-available crafts supply recommendations as I can.
Because it’s not about spending money on kids or teens (despite what they tell you!).


+(1).jpg)


.JPG)


_playing_lg.jpg)